How to Make a Kite: A Beginner’s Guide
Kite making is a fun and rewarding project that anyone can do with the right materials and a bit of patience. Learning how to make a kite not only saves money but also gives you a unique creation that can be customized to your liking. This guide will walk you through the entire process of making a simple yet effective kite, from gathering the necessary materials to successfully flying it. Whether you’re a beginner or looking to create a kite with your kids, this guide has you covered.

What Materials Do You Need to Make a Kite?
To build a sturdy and high-flying kite, you’ll need the following materials:
1. Lightweight fabric or plastic: Ripstop nylon is ideal for the sail.
2. Wooden dowels (1/8 inch): Two dowels, each about 36 inches long.
3. Strong string or line: Kite string must be durable enough to withstand wind stress.
4. Clear tape: Useful for securing and reinforcing parts.
5. Glue: A strong adhesive works best.
6. Scissors: To cut materials accurately.
7. Marking pen: Helps in drawing precise cuts.
8. Ruler or measuring tape: Ensures exact measurements.
9. Materials for a tail: Lightweight fabric strips, plastic streamers, or ribbon.
Having these materials ready will make the assembly process smooth and enjoyable. Choose materials that are lightweight yet durable to ensure your kite flies well.
Step-by-Step Instructions to Assemble Your Kite
Cutting the Sail and Frame to Size
Start by measuring and cutting your material. Lay out your sail material flat, and draw a diamond shape roughly 24 inches wide and 36 inches long. Cut out the shape with sharp scissors for clean edges. Next, cut the wooden dowels to the appropriate length. One dowel should be 36 inches (the kite’s height), and the other 24 inches (the width). Use sandpaper to smooth any rough edges.
Constructing the Frame and Attaching It
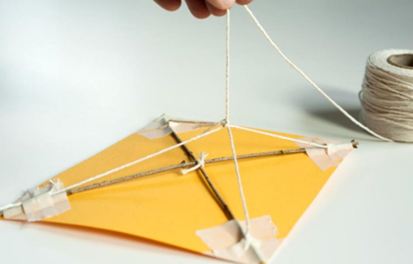
Lay the longer dowel vertically and the shorter one horizontally to create a cross. Secure them together at the intersection with strong string or clear tape. Ensure that the cross is centered. Place the sail over the frame, ensuring the dowels align with the edges of the sail. Fold the sail material over the ends of the dowels and secure it with clear tape. Use extra tape at the corners to reinforce the sail.
Adding the Tail and Reinforcing Key Points
The kite tail is essential for stability. Cut lightweight fabric into strips about 4 inches wide and 40 inches long. Attach these strips to the bottom of the kite using tape or string. Reinforce key points like the intersections of the dowels and the attachment points of the tail with extra glue and tape. These areas are under more stress and need extra strength.
How to Attach the Bridle and Flying Line
Understanding Bridle Points
The bridle plays a crucial role in keeping your kite stable and allowing it to fly properly. To set it up, create two secure bridle points—one at the top and one at the bottom of the vertical dowel. These points will help balance the kite in the wind and make it easier to control while flying.
Securing the Flying Line for Balance
Cut a piece of string that is twice the length of your kite. Securely tie one end of the string to the top point of the kite and the other end to the bottom point. Make sure the string is taut enough to hold shape but not overly tight. This string will serve as the kite’s bridle line.
Testing the Bridle Before Flying
Attach the flying line securely to the midpoint of the bridle. Lift the kite gently by this connection point to check its balance in the air. If the kite tilts to one side or doesn’t stay level, adjust the knots on the bridle accordingly until it balances evenly. Proper balance ensures stable and controlled flight.

Tips for Flying Your Homemade Kite Successfully
Best Weather Conditions for Kite Flying
Fly your kite on a clear day with steady winds, ideally between 5 to 15 mph, for the best control and lift. Avoid flying during extremely windy, stormy, or rainy conditions, as these can make handling difficult and potentially damage your kite. Open spaces like beaches or parks offer the safest and most enjoyable flying experience.
Launch Techniques for Steady Lift-Off
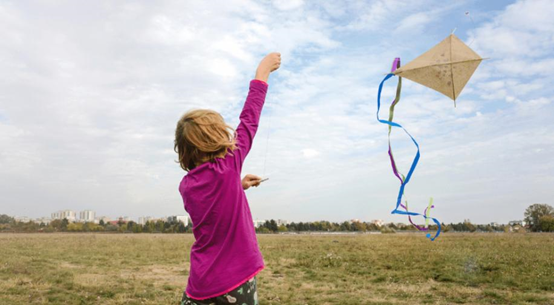
To launch the kite, hold it up by the frame and position it so the wind can catch the sail. As the breeze lifts the kite into the air, slowly release the flying line to allow it to rise higher. Keep steady tension on the string to maintain control and ensure a smooth, stable ascent.
Safety Tips to Keep in Mind
Always fly in wide, open areas well away from power lines, trees, buildings, and roads to avoid accidents. Be mindful of your surroundings at all times, including people, animals, and changing weather conditions. Maintain full control of your flying line to ensure a safe and enjoyable experience for yourself and those nearby.
Conclusion
Making a kite from scratch can be a fulfilling and enjoyable experience. If you're wondering how to make a kite, follow this guide to create a kite that not only looks great but flies high. From choosing the right materials to mastering the art of kite flying, this guide equips you with the knowledge needed for a successful kite-making venture.
FAQ
What is the best material for a homemade kite?
Ripstop nylon is highly recommended due to its lightweight and durable properties, making it ideal for kite sails.
How long should the tail of my kite be?
The tail length depends on the size of your kite, but a good rule of thumb is one yard (36 inches) for every foot of kite height.
Can I make a kite without using wooden dowels?
Yes, alternative materials such as bamboo or flexible plastic rods can be used in place of wooden dowels for your kite frame.


