How to configure the network card in Windows 10 for maximum speed
The network card is one of the most important parts when connecting to the Internet. Thanks to this device that is in our computer we can enter the network at a certain speed. So it helps determine the speed. Currently we find various types of network cards available. They can be a wired, wireless network card to connect to WiFi or Ethernet.
How to configure the network card in Windows 10 for maximum speed
A very common situation is that users do not know the real capacity of their card. This can be a noticeable limitation. Since we do not know if we can use certain devices or if we navigate at the maximum speed available. Therefore, it is good to know this detail in order to get the most out of our network card.
Next we leave you with the way to configure our network card in Window 10 so that it is at maximum speed and thus get more out of it. We explain how to do it for an Ethernet network card, which is the most common today.
Gigabit Ethernet network card
The most common is that current computers have a Gigabit Ethernet network card. Since they are prepared to receive the current connection speeds. So if you have a recent computer, it is sure to have this card inside. One of the reasons why these cards are used is the increase in Internet speed that has occurred in recent years.
The advent of fiber optics has helped make this happen. Since high speeds of up to 300MB symmetrical have been reached, although it is expected that within not too long it can even reach 1 GB. Therefore, in order to have the maximum speed we need a network card and that it is well configured. We must have a 10/100/1000 card, compatible with speeds of up to 1gb/s. These are Gigabit Ethernet network cards.
If we have one of these cards we can have up to 100 mb. It influences both Internet speed and when copying files to a server hard drive. One of the main problems is that on many occasions the cards are misconfigured. Therefore, we explain how to solve this below.
We recommend reading the best routers on the market
Configure network card in Windows 10
First of all it is important that we know the current state of the configuration. Because it may be the case that the card is misconfigured. So if the situation were like this, we would have to do something about it. Therefore, it is important that we know the configuration. The steps to be carried out in this case would be the following:
- Go to the taskbar icon and locate the Internet icon
- Click on Network and Internet settings
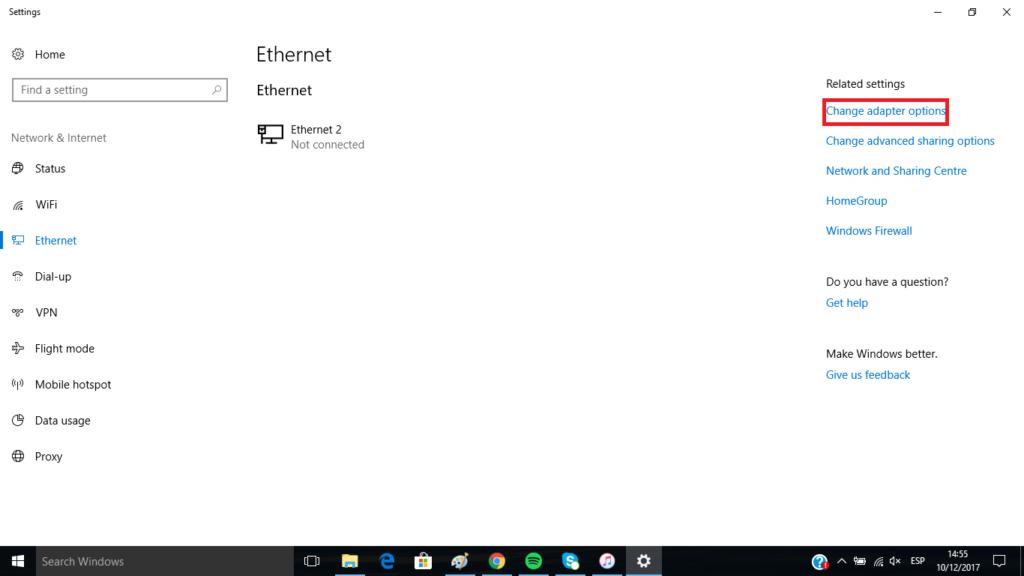
- Once inside, click on Ethernet
- Click Change adapter options
- We get the network cards that we have in the computer. We double click on Ethernet. We see that it indicates the speed within the information. It can be 100 Mbps or 1Gbps. If it is the second one, everything is fine, but if it is the first one, you have to configure it.
Which of the two figures shows your card? In the event that what you get is 100Mbps, this means that we are not at the maximum speed. So we are not getting the most out of our card. Fortunately, this can be changed relatively easily. We have to set it to 1Gbps. The steps to follow are these:
- In the window where the speed was indicated, click on properties
- Make sure the Microsoft Network Client option is checked
- We click on configure
- We go to advanced options and look for Speed & Duplex
- We have to change the value to 1.0 Gbps Full Duplex
- press accept
[irp]
In this way, by following these steps our network card is already configured at maximum speed. So we are going to be making the most of it. If it is compatible, we will be able to connect at this speed. Also transfer data to a NAS hard drive among other actions. What do you think of this solution?

